This guide will show you how to add an extra IP address to an existing interface in Red Hat Enterprise Linux / CentOS 7. There are a few different methods than on CentOS 6, so there may be some confusion if you're trying this on a CentOS 7 system for the first time.
First, determine if your network interfaces are under the control of the Network Manager. If that's the case, you'll want to keep using the Network Manager to manage your interfaces and aliases. If it's not under Network Manager control, you can happily modify your configs by hand.
View your IP Addresses
The "old" days of Linux used to be all about
ifconfig. It would show you all interfaces and their IP aliases on the server. In CentOS/RHEL 7, that's not the case. To see all IP addresses, use the ip tool.$ ip a | grep 'inet '
inet 127.0.0.1/8 scope host lo
inet 10.0.2.15/24 brd 10.0.2.255 scope global dynamic eth0
inet 172.28.128.3/24 brd 172.28.128.255 scope global dynamic eth1
This syntax is more inline with most routers/switches, where you can grep for inet and inet6 for your IPv4 and IPv6 IP addresses.
$ ip a | grep 'inet6 '
    inet6 ::1/128 scope host
    inet6 fe80::a00:27ff:fe19:cd16/64 scope link
    inet6 fe80::a00:27ff:fefd:6f54/64 scope link
So remember: use
ip over ifconfig.Using Network Manager
Check if your interface you want to add an alias to, uses the Network Manager.
$ grep 'NM_CONTROLLED' /etc/sysconfig/network-scripts/ifcfg-ens160
NM_CONTROLLED="yes"
If that's a yes, you can proceed with the next configurations using the Network Manager tool.
You may be used to adding a new network-scripts file in
/etc/sysconfig/network-scripts/, but you'll find that doesn't work in RHEL / CentOS 7 as you'd expect if the Network Manager is being used. Here's what a config would look like in CentOS 6:$ cat ifcfg-ens160:0 NAME="ens160:0" ONBOOT="yes" BOOTPROTO="static" IPADDR="10.50.10.5" NETMASK="255.255.255.0"
After a network reload, the primary IP address will be removed from the server and only the IP address from the alias interface will be present. That's not good. That's the Network Manager misinterpreting your configuration files, overwriting the values from your main interface with the one from your alias.
The simplest/cleanest way to add a new IP address to an existing interface in CentOS 7 is to use the
nmtui tool (Text User Interface for controlling NetworkManager).$ nmtui
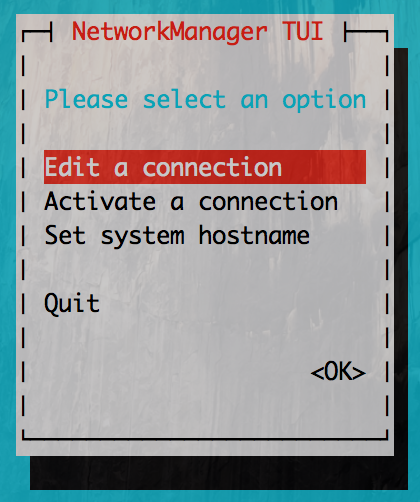
Once
nmtui is open, go to the Edit a network connection and select the interface you want to add an alias on.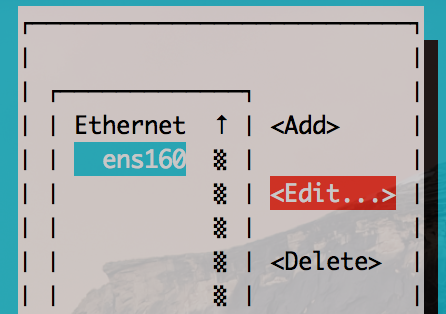
Click Edit and tab your way through to Addto add extra IP addresses.
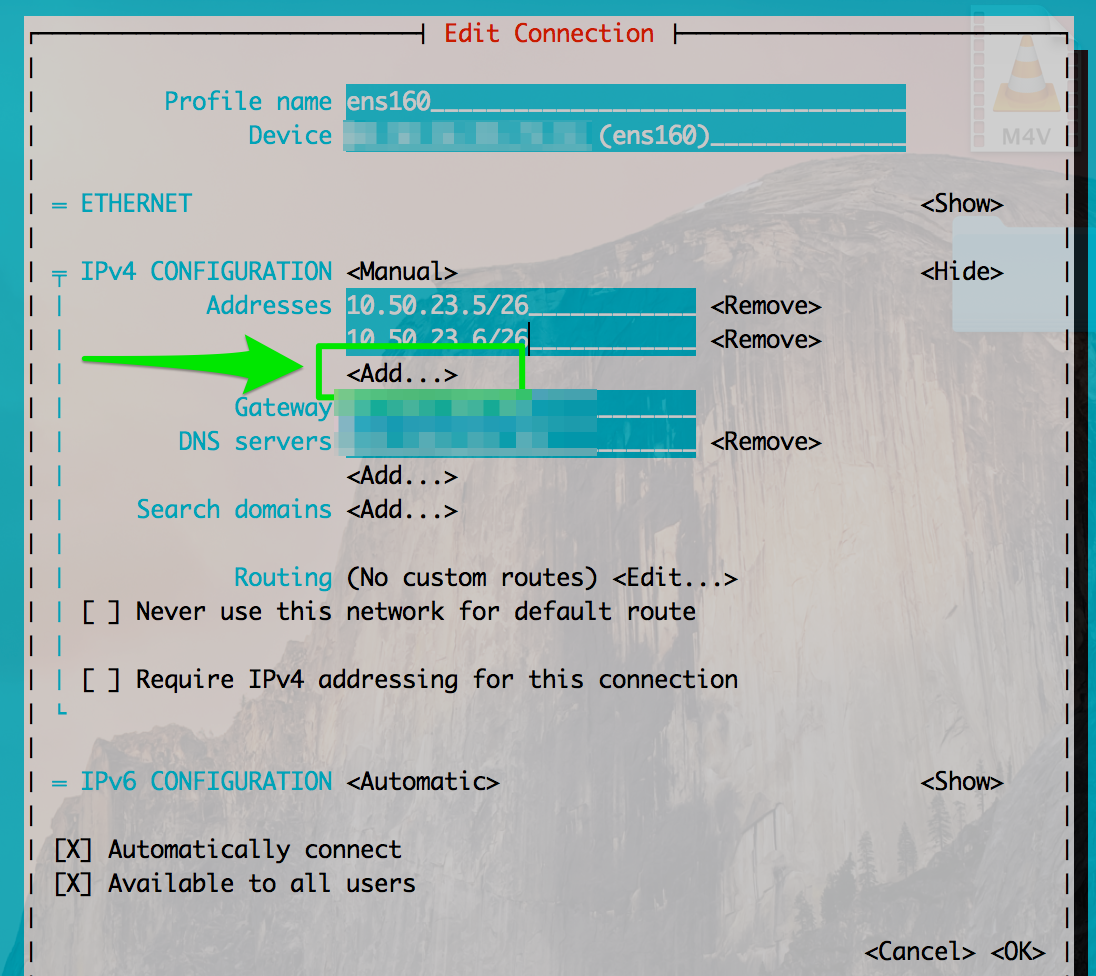
Save the configs and the extra IP will be added.
If you check the text-configs that have been created in
/etc/sysconfig/network-scripts/, you can see how nmtui has added the alias.$ cat /etc/sysconfig/network-scripts/ifcfg-ens192 ... # Alias on the interface IPADDR1="10.50.23.11" PREFIX1="32"
If you want, you can modify the text file, but I find using
nmtui to be much easier.Manually Configuring An Interface Alias
Only use this if your interface is notcontrolled by Network Manager.
$ grep 'NM_CONTROLLED' /etc/sysconfig/network-scripts/ifcfg-ens160
NM_CONTROLLED="no"
If Network Manager isn't used, you can use the old style aliases you're used to from CentOS 5/6.
$ cat ifcfg-ens160:0
NM_CONTROLLED="no"
DEVICE="ens160:0"
ONBOOT="yes"
BOOTPROTO="static"
IPADDR="10.50.10.5"
NETMASK="255.255.255.0"
Bring up your alias interace and you're good to go.
$ ifup ens160:0
Don't use this if Network Manager is in control.
Adding a temporary IP address
Want to add an IP address just for a little while? You can add one using the
ipcommand. It only lasts until you reboot your server or restart the network service, after that -- the IP is gone from the interface.$ ip a add 10.50.100.5/24 dev eth0
Perfect for temporary IPs!

